Handicraft attracts many people. For example, the ladies have long had a passion for embroidering textiles, weaving macrame. Popularity also enjoys the decoration of various items. The most suitable accessory for this is a female box. It can be painted, painted, pasted, and not only stored inside jewelry. Such an ornament can be better than a store, if you create a custom decor of the casket with your own hands. About what kind of techniques you can use while doing this, we'll tell you in detail later.
The design technique should be selected based on the functional purpose of the accessory. The most popular ones include decoupage, quilling, painting, shebbie-chic, paper art, etc. Some of them require some training.


Mosaic Technology
Decoration of ladies' boxes can be done in a fashionable mosaic technique. To do this, you will need simple tools:
- Sharp cutting objects, as well as a brush with a roller for rolling;
- Polymer clay or plastic;
- Glue binder and lacquer;
- Cardboard;
- Talc;
- Ribbon for decoration.

First of all, it is necessary to cut out the cardboard circles that form the future view of the box. For the interior of the interior is best to use white clay. You can take a reel to create a shape. It should be coated carefully with a polymer material, so that no bubbles or joints remain. Crop excess. Then circles of clay should be baked in the oven.
The outer walls should be treated with talc so that it is convenient to apply plastic. From the latter, you can create different patterns. When the circles cool, they put on a mosaic. The order of the arrangement of the details depends on the imagination. The tape should be glued to the base and cover, with the formation of a loop. When the product is ready, it can be baked again and covered with acrylic paint. Further matt varnish for finishing finishing is useful. Stylish casket is ready.


Mirror box
A delightful decor is created using the following materials:
- Sharp knife, ruler and brush;
- Glue binder;
- Gloves with goggles for work;
- Plastic made of acrylic with reflective coating;
- Scotch.

It is necessary to measure three straps on acrylic plastic. Cut the panels in such a way that you can stack rectangular workpieces. After the adhesive bonding panel is applied, the panels are joined. Then it takes several hours to dry. When the shape of the box is ready, the inner part can be pasted with felt.
Until the last stage, the plastic should be in a protective film.

Casket in the style of the shebbie-chic
Exquisite technique means creating a product that is ideal for storing jewelry. The following components are required as tools:
- Cloth, lace, and also a dense thread;
- A beautiful box of candy;
- Decorative beads, beads;
- Glue binder;
- Polyfoam, as well as a sheet with a pattern.

From paper and polystyrene it is necessary to cut out forms for the bottom of a candy box. Then glue the box with a sheet with a pattern. Next, you need to form a lid of paper and fabric. To do this, you can take a ready-made form of foam and sew. After installing the lid, the box is decorated with various elements (beads, laces, etc.).


Accessory made of eggshell
To create such a box, special skills are not required. The following components are used as materials:
- Eggshell;
- Glue binder;
- Carton box;
- Acrylic paint with a brush;
- Napkins with a pattern.

After preparation of the cardboard box, it should be greased with glue. An ordinary PVA is suitable. To the wet area should be attached to the shell, and then gently crack it. Of small fragments, then a mosaic is formed, and again processed by a binder. After drying, it is the turn of the paint. For decoration use patterned napkins. To fix, you will also need PVA glue. It is important to wait a few hours until the entire product dries.


Decoration with Kanzashi
Under an unusual Japanese name, flowers are hidden to decorate the hair. As materials for creating the original box, the following elements will be required:
- Wooden (bamboo) casket;
- Glue binder;
- Threads with beads and rhinestones, as well as tweezers;
- Scissors with a needle;
- Two-color ribbon;
- Candle.

Decoration of a stylish wooden box begins with the formation of Kansashe petals. To do this, they are bent at the right angle, and smelt the edges over the candle. They should stick together to make the flower flat. Such details will need about a dozen. Then thread on the thread, alternating colors. Then the ends of the thread are connected, and the petals straighten. In the center of the future casket you need to anoint with glue to hold the flower tightly. Then, in the center of the flower, apply glue. This is necessary for attaching crystals or beads.
When using rhinestones, it is forbidden to use the glue "Moment", which corrodes the glossy coating of parts.


Quilling
An amazingly simple technique involves twisting paper strips to create a decor. Materials in this case will be: multi-colored paper, toothpick and brush with glue.
First of all, spirals of different colors are twisted. Then they are glued together into strips. Then, long bars are formed, to which the above-mentioned bands are glued. They also glue together to form the base of the future casket. Spirals are conveniently twisted with a toothpick. To the walls of the product can be glued leaves cut from green paper. Likewise, the bottom and the lid are laid out. It is desirable to decorate the top part with flowers. For this purpose, colorful strips of twisted spirals are connected in a special way. The last step is the impregnation of the adhesive bond.
Read also: Spring decor for the house with their own hands 


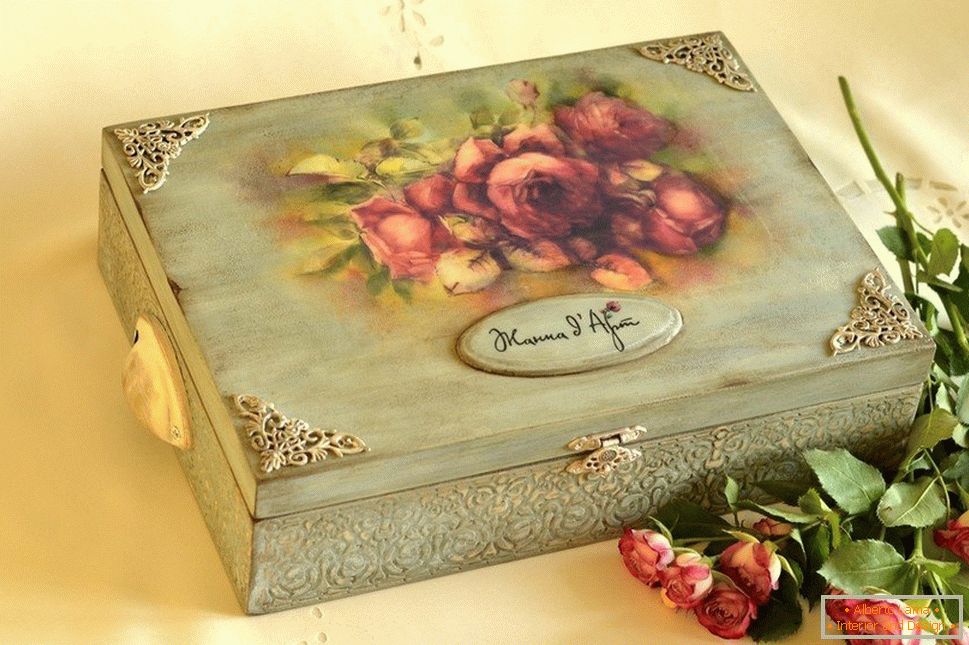
Decoupage
This technique has French roots. Previously, they were preparing a special paper with ornamentation to lay out the decorative elements. As materials for decorating a homemade casket, the following components will be used:
- Cuttings from fabric or fashion magazines;
- Glue binder;
- Paint with a brush;
- Lacquer.

Using scissors from logs, the details of the pattern are cut out. They are applied to the surface of the product, after which the glue is applied from above.
If you use fabric, then instead of glue it is recommended to use a stapler for fastening the elements. You can also do without varnish.
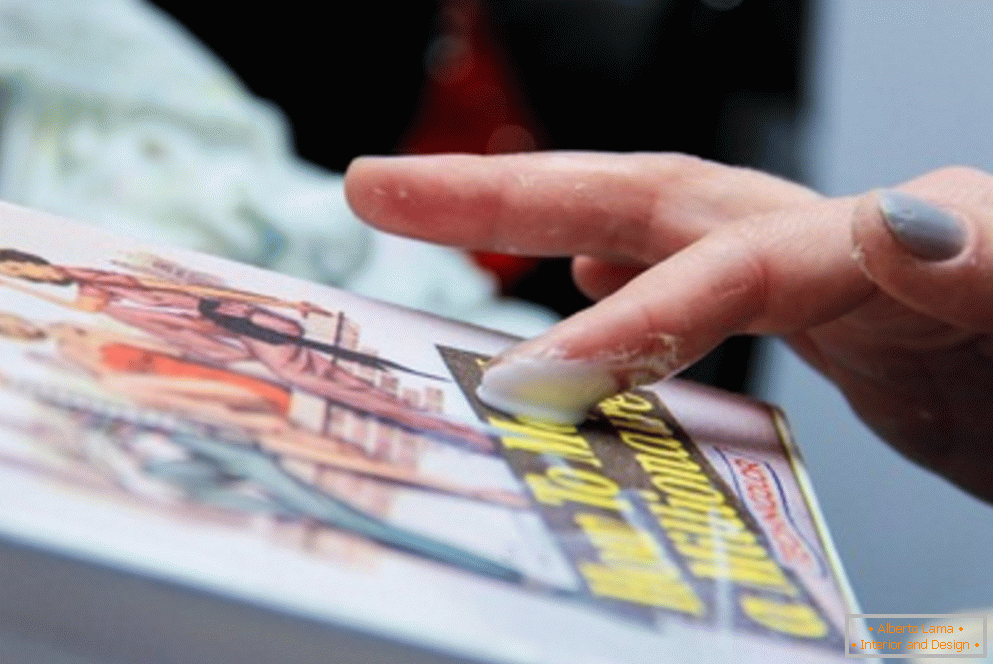
After drying the product, it is varnished. In this technique, the use of photo cards is welcome. They are previously rid of the lower layer. You can decorate the box not only from the outside, but also in the inside.


Vinyl wallpapers
Popular material is well suited for decorating the product in question. Their relief texture perfectly looks on a wooden or cardboard box. In this case, the pattern on the surface can be absolutely anything. However, it is desirable that its dimensions coincide with the dimensions of the cover of the future accessory. An exception is an abstraction.

The technology of creation implies the following actions:
- First exact measurements of the box are made. Next, a pattern of material is made;
- After the vinyl material has been cut, it is recommended to soak it in water. This is necessary to separate the vinyl from the paper substrate. A clean layer of wallpaper will lie flat on the surface. However, this is a laborious procedure, with which not everyone can cope;
- Then a glue binder is applied to the vinyl layer. If the paper base is left in place, it should also be smeared;
- The material is fixed on the product under the press;
The surface can later be decorated with herbarium or artificial flowers.
- Then the product is covered with a multilayer varnish;
- When using the print it is recommended to use acrylic paint. This allows you to show maximum imagination. Popular shades for creating an accessory with their own hands are gold and bronze.
The latter can be further aged, if combined with green. Also I will look good silver glare. After finishing works the surface is covered with a multilayer colorless varnish.


Painting
Many craftsmen want to show their artistic talents. The technique of painting for this fits perfectly. Some scenery options require special education. However, beginners can use stencils. You can find them in the store or on the Internet. In the latter case, it is enough to download sketches and print. On sale it is possible to meet both single-layered and multi-layered stencils.
See also: Paper flowers for decor: master classesThis technique assumes the following steps:
- Preparation of the product for work. It includes a mandatory degreasing, as low-visibility spots appear after application of the paint;

- Also, you can not do without priming with white paint. This is important for the purity of the colors used;
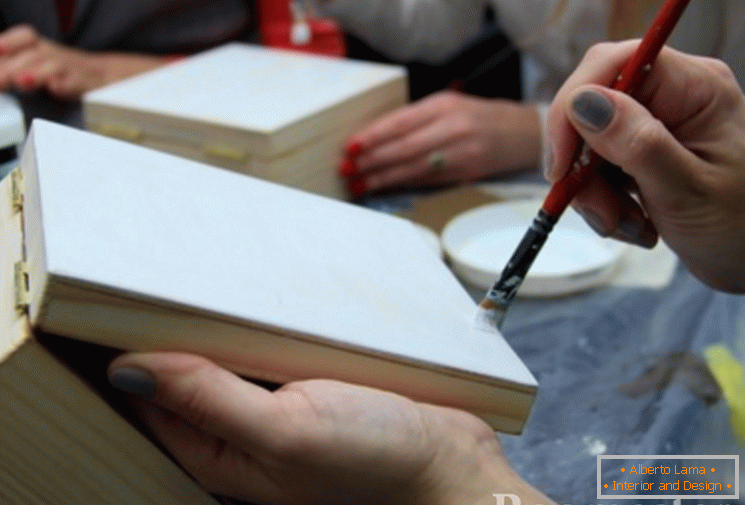
- When the preliminary manipulation is completed, the surface of the product is covered with a basic tone;
- You can use different types of stencils to perform the painting. Some contain an adhesive basis for convenience. Others have to be fixed with an ordinary tape. It is recommended to apply several sketches for the purity of the experiment;

- To darken the corners a semi-dry sponge is used. It dipped in the dyeing material and wiped with a napkin. Then you can use it to create an attractive haze at the corners of the casket;
- Another option for darkening corners is to pre-use a darker shade. If the main background is blue, then the corners must be covered in blue. This contrast tone can be softened with wax or sandpaper. This will give the charm to the future accessory. After the drying out of the corners, the planes are covered with the main tone;
- The finished product must be treated with a colorless varnish.


Expensive paint from an art store can be replaced with an acrylic version from a regular store. To achieve the necessary shades in this case is not difficult, if you use this or that color. One can of inexpensive paint is enough for just a dozen boxes.


Volumetric decor
The application of this technique also involves a number of preliminary actions. This is due to the fact that a stencil and a special paste are used here. Some needlewomen successfully replace it with putty. This gives an accessory in vintage style. Exquisite design is gaining its volume already at the priming stage. Before this we remember that it is necessary to degrease the surface. With the corners should be at your own discretion, as the technology is already familiar from the previous paragraph.
After staining and drying the product, a stencil is attached to the surface. Puttying is carried out in two stages, between which it is desirable to clean the sketch. Immediately after applying the paste, it is necessary to correct possible irregularities with the help of a toothpick. A soft cloth for removing surpluses should also be at hand. If the defect is found after a time, you will need to wet a place to soften the material. Then it is necessary to coat the product with varnish. To create a characteristic convexity, diluted bitumen can be used. Next, using a thin brush paint these places the main tone. Then again coat the product with varnish.


Conclusion
The key feature of the presented decoration techniques is that with their help you can make a casket with your own hands. Homemade and original products will become a favorite decoration in the ladies' room.


