Today in specialized stores you can buy a chandelier of any configuration and design. The price range is also huge. But, creative people are not looking for easy ways: someone is engaged in decorating old or out-of-fashion products, someone is making lighting devices from scratch and then decorating them with different materials and objects. This article contains interesting ideas for decorating light devices.
- primer (acrylic or intended for metal objects);
- acrylic colors of the right colors in cans;
- pearlescent aerosols, metallic colors and fluorescent colors as an alternative to electric lighting;
- colorless acrylic lacquer. The composition protects the surface from external influences, gives shine, makes the colors more saturated;
- means for degreasing the surface;
- Painting tape and other protective materials;
- tools for removing and parsing chandelier elements;
- protective accessories (respirator, gloves).

Preparation for painting
We will cover the workplace with protective materials; turn out the light bulbs, remove from the chandelier superfluous elements, with which we will not work; we protect the non-removable parts with paint tape;
- clean the chandelier from dust and other contaminants, dry it;
- degrease the surface of the lighting fixture.

The process of creating decor with paints
We treat the surface with an aerosol primer. Shake the can before work and begin spraying the primer from top to bottom at a distance of 20 cm from the chandelier.
For a qualitative uniform color, 2-3 layers are required. Each layer should dry well.
A freshly painted chandelier can be additionally protected and made more expressive by using a layer of acrylic lacquer. The composition will dry for 2 hours.
After complete drying, chandelier elements protected with paint tape can be released, screwed in the bulbs and attach the previously removed parts.


Decoupage
We paint the elements of the chandelier, which require updating with white acrylic paint. We take the necessary napkin for decoupage, remove the 2 lower layers and begin to paste on the parts that require decor with a brush. For work, you can take PVA glue and dilute it with water or buy glue for decoupage.
After complete drying, we apply a layer of varnish for decoupage on top, leave to dry. To the top of the chandelier, you can attach the gypsum rosette with a special mixture.


Wood decoration
Wood is a natural material with which it is pleasant to work, and wooden products create a warm home atmosphere in the room. The original decor for lighting fixtures can be made with the help of spills, twigs, wooden objects of everyday life, etc.


Spins
A floor lamp made of wood splits perfectly complements the interior of a country house or a city apartment, furnished with eco-friendly wooden furniture.
Materials and tools;
- a fragment of a tree trunk - 40 cm;
- LED Strip Light;
- cellulose varnish;
- power adapter;
- electric wires;
- saw;
- grinding mechanism;
- drill / drill bit (crown, sheet);
- glue.
We will prepare 10 wooden circles 2 cm thick each. Drill holes in 8 wooden blanks. In the 2 remaining we will make only depressions.
Let us grind the surface of the circles. The inner surfaces of the holes are spread with joinery glue. Cover the mugs with varnish in several layers, make them matte.
We proceed to collect the lamp: we will put the mugs on the tube and glue the structure. On the tube we will hold the LED tape and connect it to the adapter.


 we drill only grooves, approximately half the thickness")


Branches
Chandelier, decorated with branches of natural wood can be displayed in the bedroom or living room, creating a unique style and home comfort.
As a natural material suited dried flexible branches of different species of trees.
Materials and tools:
- dry branches;
- shape (rubber ball);
- aerosol paint;
- varnish;
- glue on a tree;
- chain for fixing the chandelier to the ceiling;
- film;
- Scotch tape bilateral;
- chopper.
We will clean the branches and make of them billets of 20 cm each. We wrap the ball with film and install it on the working space, fixing with adhesive tape. We decorate the ball with branches, connecting them with glue, dry. We change the position of the ball, reattach and glue the branches, bypassing the top, through which we will install the cartridge and twist the bulb, dry it.
We remove the ball, which served to betray the design of the shape of the ball. After everything has dried, you can start painting or varnishing the future chandelier.
We insert the cartridge and energy-saving light bulb (to avoid overheating), we hang the chandelier on the chain.


Using wooden hangers
Using wooden hangers можно изготовить люстру сложной формы для оформления интерьера в эко-стиле.
Materials and Tools
- wooden hangers - 50 pcs .;
- steel wire;
- drill.

We make a lampshade, consisting of 2 bases - rings of different diameters of steel wire. At the ends of the hangers we drill holes for the further binding process.
We connect the hangers with a ring of smaller diameter: we pass the wire through the holes made. Hangers, designed for fastening with a large ring, are placed symmetrically. We pass the wire from the opposite end.
If you make holes at an angle of the same degree, the hangers can be lapped. Such a lampshade can be left "in the tree" or painted.

Plastic
In each house there are plastic bottles of different shades. They can be used to create an exclusive chandelier.
Materials and tools:
- aerosol paint;
- metal rings of different diameters - 2 pcs .;
- newspapers;
- wire;
- scissors;
- gloves.
We cut the bottle into 2 parts. The upper and lower halves are cut into strips 1 cm wide, these are blanks for future colors. Strip-petals bend in a circle.
Cover the work surface with newspapers and proceed to coloring the flowers: spray on the plastic billets of paint. We dry.
Next, we turn to the manufacture of the chandelier: we take a small hoop, we let the wire into the neck of the bottle, wrap it around the frame, fix the flowers. Flowers are located as close as possible to each other. The same is done with a large hoop. We connect the hoops wire: take 3 pieces, measure the distance between the frames, cut off the wire with the winding in mind.
We wind the wire around one frame, unbend it, and wrap its other end around hoop No. 2.
On the arc of the hoop we note 1/3 of the circumference, we wound the second piece of wire.
We will measure another 1/3 and connect the hoops with the third segment.


Leaves from plastic bottles on a plafond
From plastic bottles of different colors, you can create an original decor of a chandelier in the form of leaves, for example, birch.
We cut plastic bottles into small fragments and make leaves from them. In order for the leaves to look more neat and natural, we will fuse them with a soldering iron along the contours (a tool with a thick sting and a bevel on one side will do).
With the help of the edge of the sting we create on each leaf streaks. Next, we heat a thick needle and make holes at the base of the leaves. This is for fastening.
We make twigs: string the leaves on a wire of small diameter, then, wind them on the base of steel wire.


From disposable spoons
For the kitchen or living room, you can create an original chandelier made of disposable plastic spoons. Such an unexpected chandelier is economical, provides a good level of lighting, creates fantasy projections on surrounding surfaces and objects.
Materials and tools:
- plastic bottle 5 l;
- plastic spoons - 150-170 pieces;
- energy saving light bulb;
- cartridge;
- copper wire;
- нож/scissors;
- PVA glue.

Manufacturing
First, let's make a foundation, which will serve as a plastic bottle and evenly cut the bottom. Center the lid pierced with a red-hot awl. Through this hole let's pass the cord and attach it to the cartridge.
Let's move on to the decorating process. To do this, only the deep parts of the spoons will need to be cut off. We glue spoons around the base row after row in a checkerboard pattern lapping from the bottom up.
From above we make a horizontal row, which will be crowned with a chandelier. Inside the plafond we install a cartridge and a cork.


Chandelier from music discs
Older CD-disks can be used for decorating home lighting fixtures: lamps, plafonds, chandeliers.
The brilliant surface of the CD, which includes the entire spectrum of colors, will glow the chandelier even more
Read also: Decorating flower pots with your own hands - 8 ideasstrong and spectacular. A small chandelier from music discs in the form of a flashlight can be hung to illuminate the corridor.
Materials and tools:
- Wooden boards of rounded form thinner and thicker - 2 pcs. Diameter досочек. more than a CD;
- stands in wood or metal;
- magnetic switch;
- fluorescent light bulb;
- disks.
Make a hole in a thick board, mount the starter + switch, connect to the lamp. We string the discs on the lamp. Around the discs we set up the racks, cover the structure with the upper board.


Paper
A creative luminaire with marine motifs can be made, taking as a basis the master class "Coral Inspiration".
Materials and tools:
- colored paper;
- colored yarn;
- PVA glue;
- fishing line;
- scissors;
- paper clips;
- compass;
- LED lamp;
- electrical accessories.
On the paper of the chosen color, we will draw semicircles of different diameters. The width of the blanks is 1 cm. We cut them out, and then cut them into lengths from 2 to 5 cm. Further, we cut off the segments in the form of cones and glue each separately, and then several pieces together and so on until the ball is formed.
We will decorate the wire with colored yarn, then, make the holder. Inside, we install the lamp and connect it to the wire.


Origami
In the technique of origami, you can create a lamp-sconce, which is suitable for zone lighting of a bedroom, a nursery and any other room.
Picking up a suitable scheme of origami, you can quickly make an exclusive lamp. For example, you can take as a basis the scheme by which a sheet of paper becomes voluminous and will have a pattern in the form of rhombuses with lines of folds in the center.
Turn the workpiece into a tube, we get a shape of a spherical shape. We glue the loose ends and hang them to the cartridge.


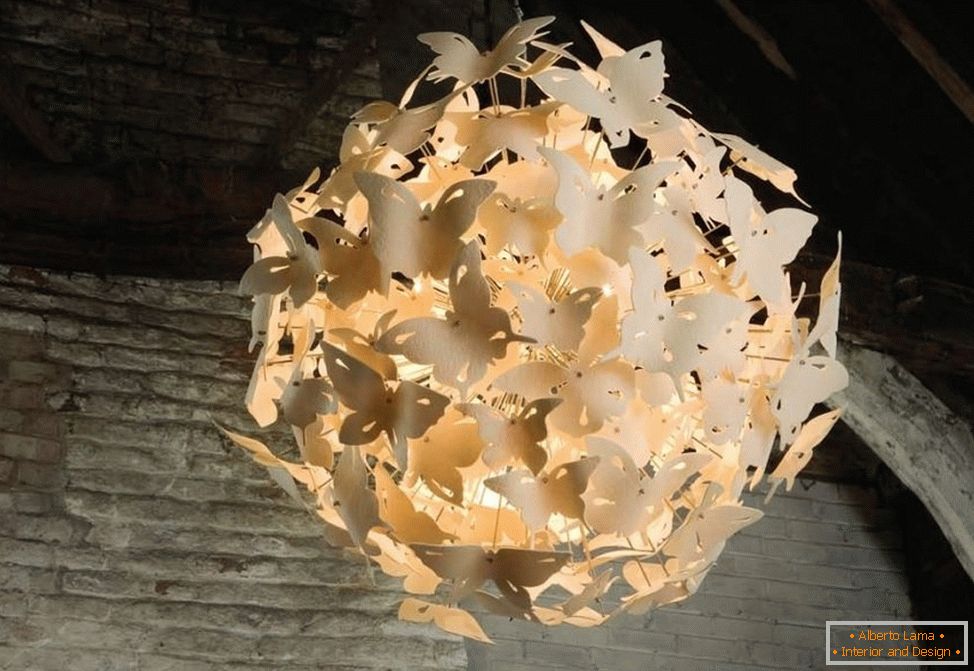
Butterflies
Chandelier, adorned with soft silhouettes of paper butterflies can be a successful option for lighting nursery.
As a basis, you can use an old chandelier or any other frame with a rounded shape. First we'll make paper butterflies. To do this, print out the template you like and cut out insect figures of the same or different sizes. It is better to choose high-density paper.

Закрепим бабочек на капроновую нитку либо на леску. Существуют 2 способа крепления: протыкать бабочек или сажать на силиконовый glue.
We will put threads with butterflies on a skeleton and we will decorate a composition.
You can also take as a base a ball of wire and "plant" butterflies on its surface with an adhesive gun.
The chandelier can be left in white or painted in any other.

Other ways - forms from under the muffins, from cotton wheels and other
As a decor for a ceiling light perfectly match paper molds for cupcakes of different sizes and colors.
Materials and tools:
- paper molds - 120 pieces;
- Chinese paper lantern;
- plate;
- glue;
- electrical accessories.
We install a paper flashlight and paste the biggest shapes on the top of the lamp in a circle, so we glue 3/4 of the area of the flashlight, then turn it over and proceed to the bottom part.
Further, inside small molds paste small. Leave to dry, then connect the wire with the LED lamp.
A similar lampshade can be used for a table lamp or wall lamp. For additional gloss in the core of the molds, crystals or large beads can be attached.

By the same technology, a luminaire made of cotton wheels is created. The accessory resembles a fluffy dandelion. This lamp can be hung in any room to update the familiar interior.
Here, instead of the molds, you will need the wadded disks, folded along the diagonals in the form of the English letter "V". The tips of the workpieces can be fixed with a stapler or white threads.
Even paper lanterns can be decorated with New Year decor: snowflakes and frosty patterns made of paper, snow flakes made of cotton wool, and other improvised materials.


the cloth
The basis of the chandelier with a fabric shade will be an old light device or any metal frame.
If a light weightless cloth was used to sew a shade, the bottom of the product should be made heavier to avoid loss of shape. To help the master cardboard, fishing line, braid or fringe.

Next, make a pattern of fabric according to the size of the frame. The length can be arbitrary, and the width of the fabric is equal to the diameter of the lampshade.
We sew the upper fabric part directly on the frame. You can also put the frame in a fabric shade. In this case, we fold, then sew and iron the upper edge of the pattern, and on the side we make the seam by the machine method. A lamp with a fabric shade is convenient to use as a desktop lighting device or as a floor lamp.
Read also: Decor caskets with their own hands: decorating ideas + master classes 
Beaded
The main purpose of decor beading is to update the old lighting device. To decorate the chandelier, the following materials and tools will be needed:
- object for transformation;
- pearl;
- glue gun;
- sandpaper.
First, we put in order the old chandelier: remove the peeling paint and apply a new one. Then, proceed to the design of candle-lamps: we will string beads on a long string, apply silicone glue on the legs of candles and tightly wrap them with threads with beads. Install the candles in their place. The chandelier will look like new.


Threads
The ceiling chandelier, created from threads, will fill the living space with comfort and soft muted light. Such an unobtrusive lighting device can be hung in the bedroom, living room, nursery or in the kitchen. Depending on the style of the surrounding interior, the threads can be bright colors or calm pastel shades.
Materials and tools:
- High-density threads (wool, cotton fibers, tourniquet) - 1 m;
- balloons - 2 pieces;
- cartridge;
- a light bulb;
- PVA glue;
- vaseline;
- brush;
- marker.
We inflate the balloon to the desired volume. We mark the upper and lower boundaries of the location of the threads by the marker. Take the brush and spread the ball with Vaseline. We wrap the ball with threads, orienting ourselves to the marking. In the course of winding, we process the threads with glue. The density of the winding will depend on the level of light output of the product. Leave to dry, then, the ball can burst and pull out. In the upper part we will cut out the place for the installation of the cartridge. Let's check the reliability and elasticity of the lamp, inflating the ball inside it.
Further, the plafond can be painted and / or supplemented with ornaments.


Lace cover
An elegant plafond made of antique lace is suitable for a light interior in the style of Provence, and also can decorate the veranda of a country house. Using laces to create a lighting device, we give them a new life in a new, more relevant embodiment.
Materials and tools:
- lace or a fragment thereof;
- balloon;
- PVA glue;
- brush;
- electrical accessories.
From the lace we cut circles of different diameters. We shall inflate a ball, we will spread it with a thin layer of glue and we will begin to apply lacy elements overlap. Let's consider the beautiful outlines of lace, which will frame a light bulb. At the end of the process, leave the product to dry for a day. We break the ball, make a hole for the installation of the electric cartridge.
The power of such a luminaire should be minimal in order to avoid overheating of the lampshade; for more pronounced outlines and glare on the walls.


From glass jars and bottles
The creation of such a source of lighting will require the designer of perseverance, patience and skills in working with different instruments. A similar chandelier can decorate a kitchen or a bar room.
Materials and tools:
- glassware;
- cartridges;
- light bulbs;
- the wire;
- skeleton;
- rim;
- sandpaper;
- glass cutter.
Take alternately bottles and jars, at the bottom of each object we draw straight lines with a glass cutter, cut off bottoms, and grind sharp edges. Through the neck of jars and bottles we conduct electrical wiring inside, install cartridges. We fix the objects on the surface of the rim in random order. The most effective will look dark green wine bottles in combination with lighter cans.


From cutlery
Melchior and metal cutlery: spoons, forks and even knives can be used not only for their intended purpose, but also for creating a unique author's product - suspended multi-level or single-level chandelier. This is ideal for a kitchen or a restaurant.
Instruments can be hung around the light source. As a frame suitable solid wire, hoops of metal or wood, wheels from the bike. The latter option is good for having ready-made holes.
In the manufacture of chandeliers with several levels, in addition to devices, you can use a series of cups, chefs, etc.
The main rule in the manufacture of such a product is the reliable fastening of all structural elements.


Conclusion
These and other ideas for the creation and decoration of chandeliers, lamps can be realized by showing patience, using imagination and we will take some free time to immerse ourselves in the applied creative process.


