Someone, of course, will take a look at this selection of ideas and say that it is easier to buy new furniture or decor. But this article is not for them, but only for true connoisseurs of a unique style and handmade products. Here you will find 10 of the most beautiful interior items that you can do for yourself with your own hands, without spending any extra money.
The best crafts for the house with your own hands from the materials for 2018!
1. Decoupage and other ideas for furniture repair yourself
Restoration of old chests and cupboards is, perhaps, one of the main trends of our time. Many pieces of furniture eventually fail: tables and chairs loosen the case, soft furniture is pushed and requires a new "filling". But chests and sideboards can stand for many years and bore you with their obsolete appearance.
Home craftsmen and masters of decoupage not only found a way to update the design of old furniture, but also built a fashion for the use of vintage "grandmother" chests in the interior. Detailed instructions on painting and decoupage can be found in our article Ideas for the restoration of Soviet furniture with their own hands.
Below are a few photos of amazing home projects that will inspire you.


Restoration of the old chest with the replacement of handles and hand painted:
 Painting and finishing the old cabinet with metal buttons:
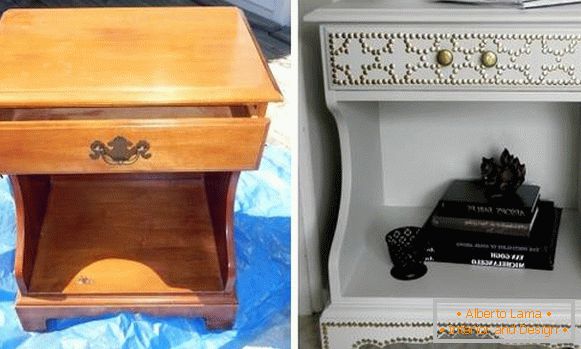 As a result, the furniture acquired an original decor effect in the Moroccan style. Just like all ingenious:
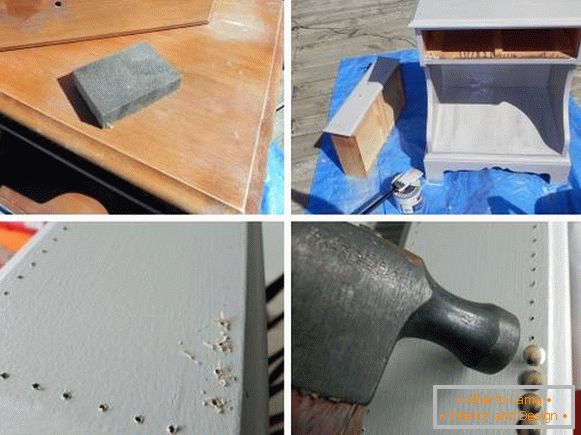
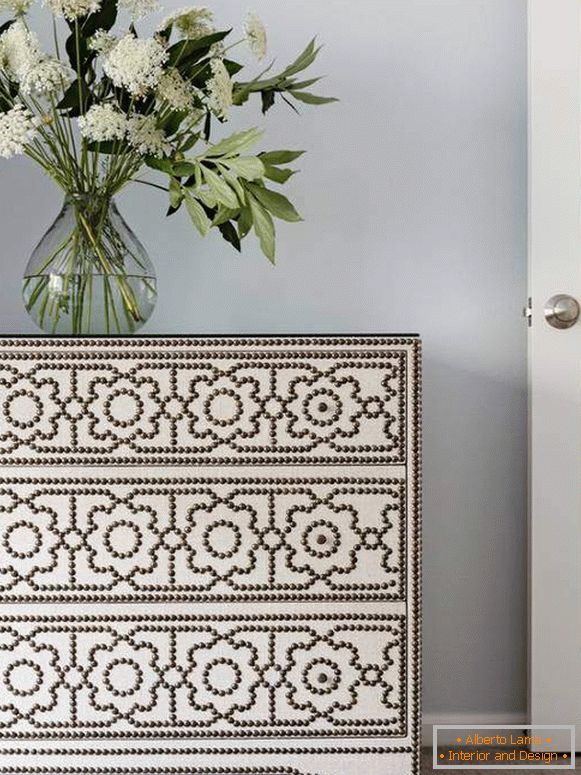
By the way, in this way you can create and more exquisite things for the house:
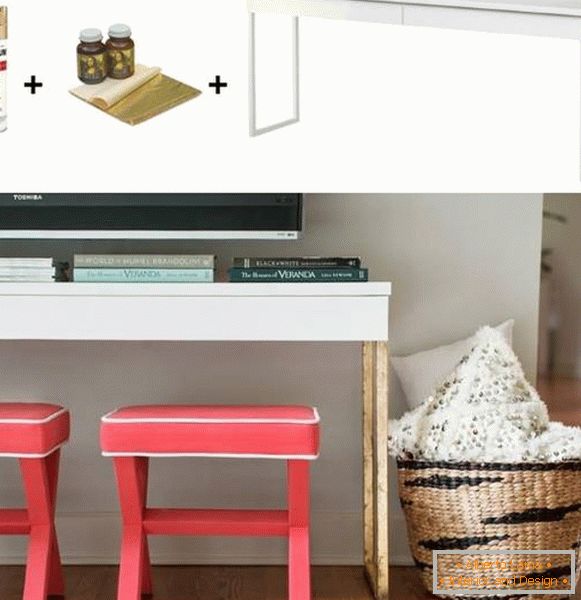
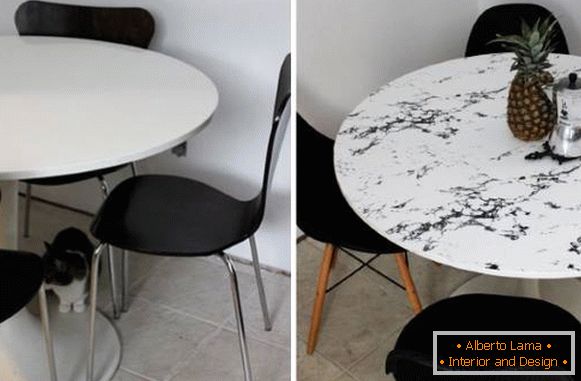
Decoupage and painting amazingly transform old furniture facades, but not everyone has enough time and patience for this painstaking business. Therefore, the best ideas for the house with their own hands also include the redesign of furniture using adhesive tape for marble, gold and other unusual coverings. A minimum of effort - and the most ordinary piece of furniture will turn into the main decoration of your interior.
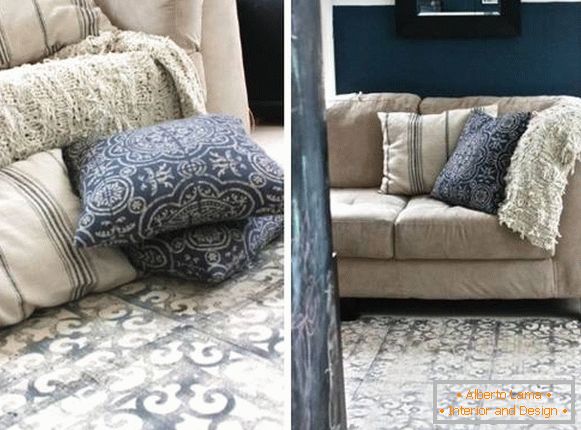
2. Beautiful things for the house with their own hands: carpets
Perhaps, the most pleasant thing in creating things for the house with your own hands is when one of the guests asks: where did you get such beauty? A stylish rug with a print of a zebra (or another motive of your choice) will certainly deserve such a compliment. And not once.
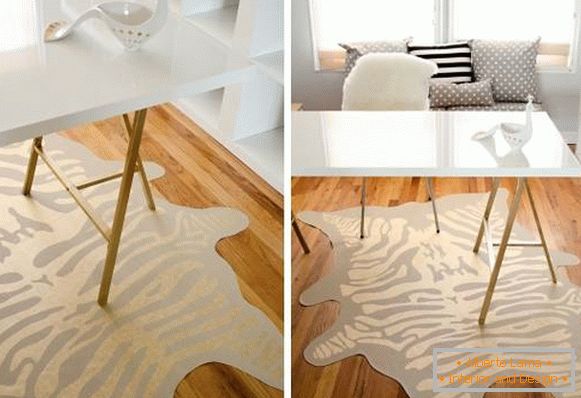
Next you will be surprised at how easy it can be done with your own hands.
The fabric can be any. The main thing is that she was not too demanding in care: she was not afraid of moisture and was easily cleaned. In this case, the wizard chose a vinyl cloth. It is heavy enough and strong to look like a true carpet. Moreover, the quality of vinyl is very impressive these days and it is available in a wide choice of colors and interesting textures.
All necessary materials and tools:
- Heavy paper;
- Upholstery fabric made of vinyl;
- Scissors;
- 2 Krylon handles or ordinary paint for fabric.
Procedure:
- Create a stencil out of paper. Draw and cut out the outline of the zebra skin, then the picture itself on it. Do not worry about your artistic talent - zebra skin and should not look homogeneous or symmetrical. In extreme cases, the pattern can be copied from the picture on the Internet or even printed to cut.
- Fasten the stencil on the vinyl fabric and trail the contours of the strips with Krylon handles (apply paint with an aerosol or brush). After that, the stencil can be removed and continue to color the areas inside the contours.
- Let the paint dry out and it's ready! For more confidence that the pattern will hold, you can "seal" the carpet by spraying a transparent coating of acrylic spray paint on it.
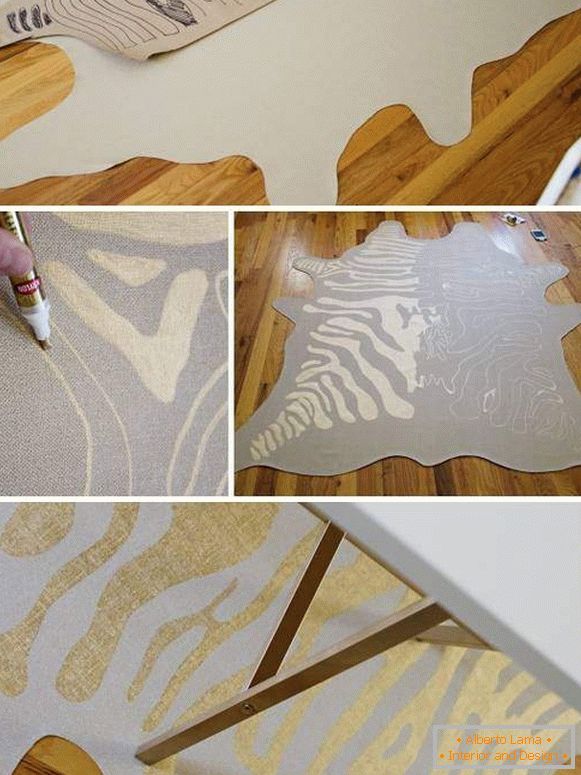
Handles Krylon create on the surface of fabrics a tremendous effect of gold leaf. In addition, the paint in them quickly dries up and is very securely held. If you can not buy them in your city, then use ordinary paint for fabrics or walls. As the next hero of our article.
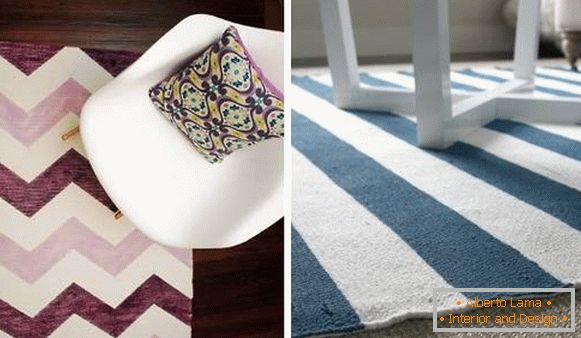
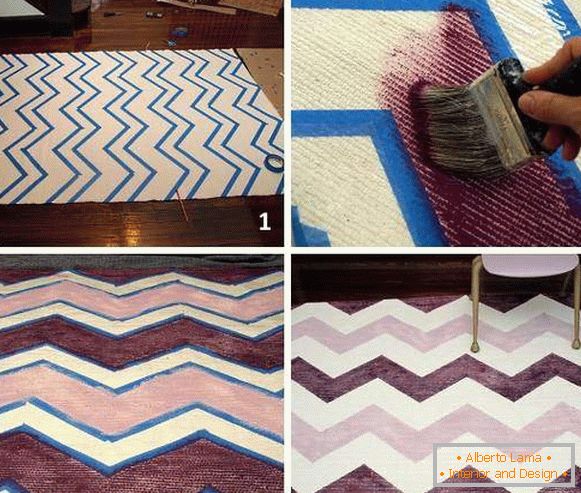
He took as a basis a cheap white rug and decided to give it an interesting look with his hands with the help of a chevron pattern. All he needed was a thin adhesive tape, scissors, a thick brush and latex paint of two different shades.
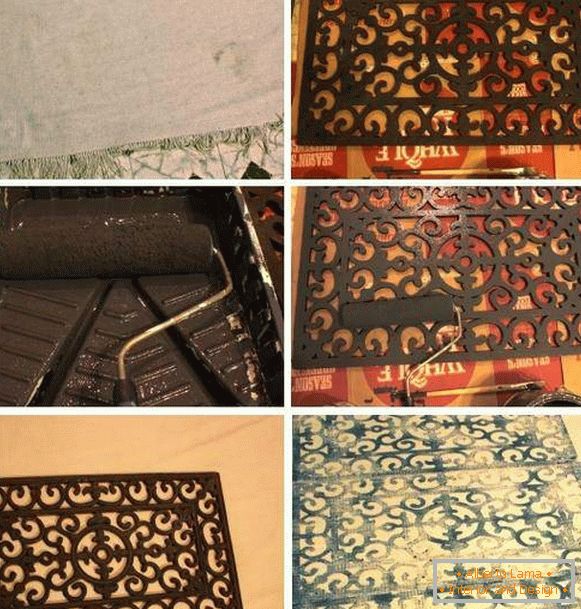
Finally, another inspiring example, in which an improvised stamp is used instead of a stencil. The master had a rubber bath mat, the remains of paint for the walls (to achieve a vintage effect, it was slightly diluted with water), a roller and an old IKEA wool carpet. Look at the photo that he was able to cook from these ingredients.
3. Unusual "marble" crafts with their own hands (photo)
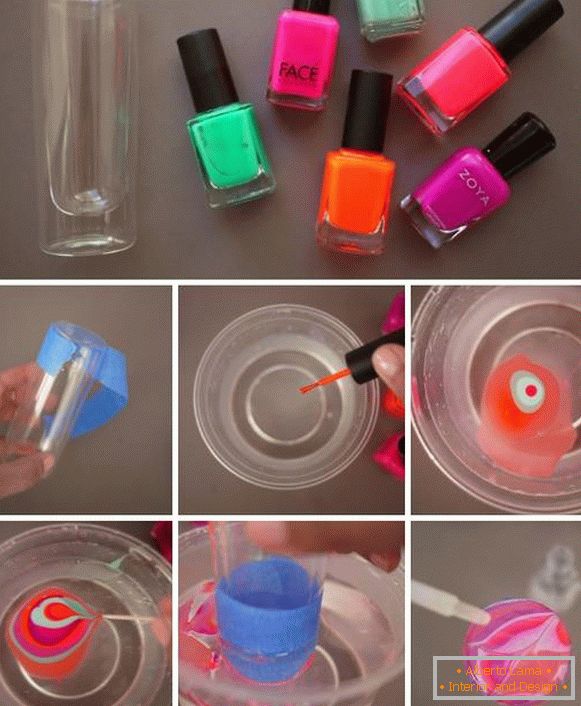
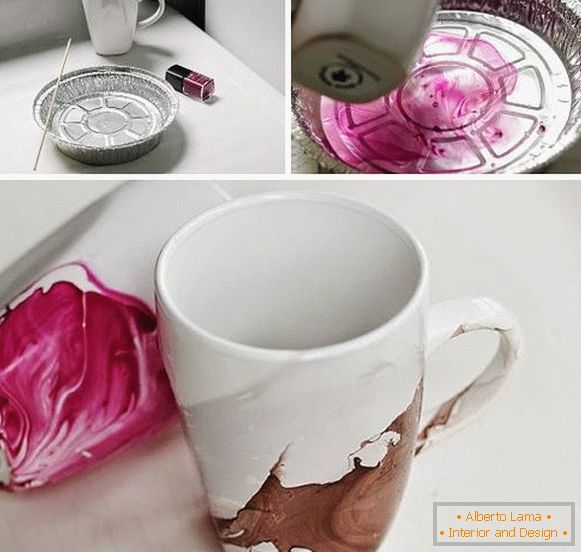
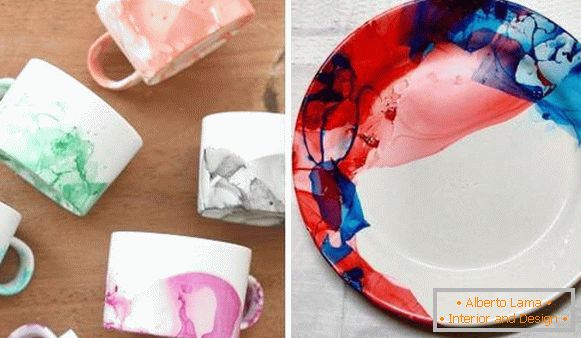
In our article Modern interior items: trends 2016 you could find out that the effect of marble is extremely fashionable. But who would have thought that it could be achieved with the usual nail polish? And apply not only in manicure, but also to create a beautiful decor for the house with their own hands.
What you need:
- Object for painting (any dishes, flower pots and other hard, slightly absorbent items);
- Minimum 2 nail polishes of any shade of your choice;
- Transparent nail polish or clever enamel;
- Disposable plastic or other container;
- Nail polish remover;
- Thin adhesive tape;
- Toothpicks.
Procedure:
- With adhesive tape, we limit the area that will be stained.
- Pour water into a disposable container. We open all the bubbles of nail polish, except for clear, and start to drip with paint from the brush in the water, one color at a time. The layer of each next color must be applied over the previous one.
- Take the toothpick and draw a few strips from center to edge (see the photo below). Act quickly, as the varnish will begin to harden very soon.
- Immerse the bottom of the cookware (bounded by a ribbon) in the resulting pattern on the water. Let it gather around from all sides of the object, then gently pull it out and leave it to dry.
- Before you paint the next object, remove the remaining varnish from the toothpick and repeat the previous steps.
- When your new decor completely dries, fix the marble pattern with a layer of clear varnish. When this layer also dries, remove the adhesive tape and clean the occasional varnish stains with a removal fluid.
Here are some more photos with examples of creating such a decor for the interior.
The following 3 positions in our article are occupied by hand-made articles made from fabric for the home.
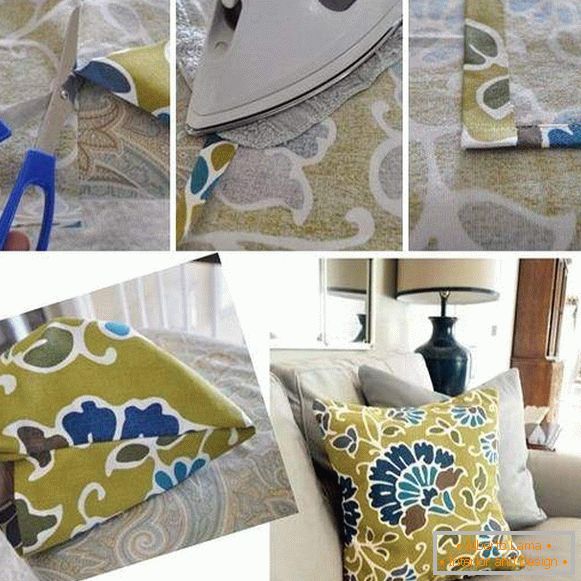
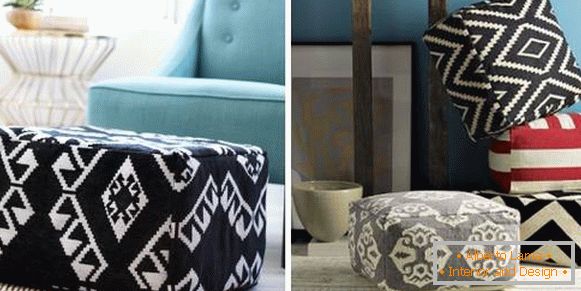
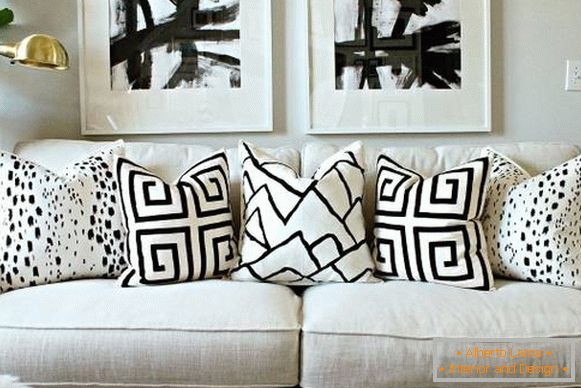
4. Woven crafts for interior: pillows with their own hands
Bright cushions and ottomans - an easy way to change the mood in the interior and update the design of the living room. If you have a sewing machine, then you will not be able to make such an interesting decor for the house with your own hands. Here is an example in the photo:
If you do not want to buy a new fabric or do not have a sewing machine, you can still update old pillows by painting them in a new color or creating patterns with a stencil (by the same principle as done with carpets - see the instructions above) .
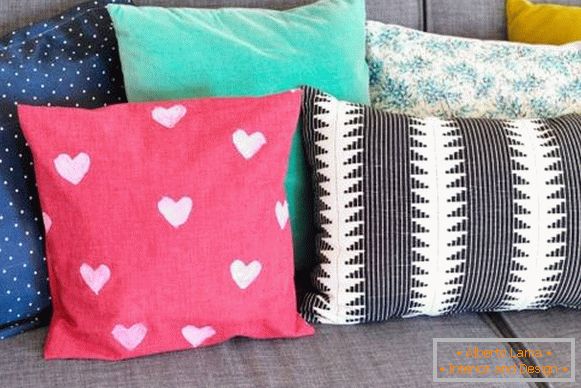
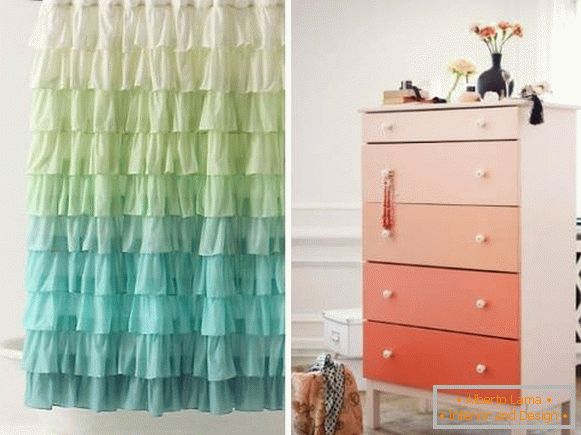
We will give you an example of one very interesting method of dyeing a fabric, when, as a result, it acquires a fashionable ombre effect.
In this case, the master used RIT dyes for fabric, but you can apply any others. To make the pillowcases lighter and faster absorb the paint, it is recommended that they be thoroughly moistened with water. To achieve the effect of "Ombre" in a container with a diluted dye, we dip the pillowcase by about 2/3 of the length, then immediately remove it from the liquid by another 5 cm. Leave in this position for about 5 minutes, after which we take another 5 cm. And so until the end, until the pillowcase is completely removed from the dye. The result of the wizard is shown in the photo on the left.
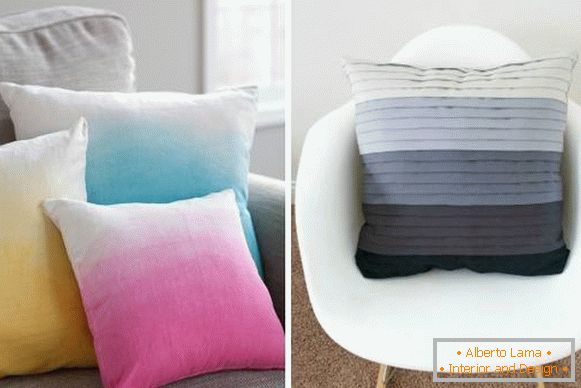
In the photo on the right and below are still examples of stylish things for a house with the effect of an ombre.
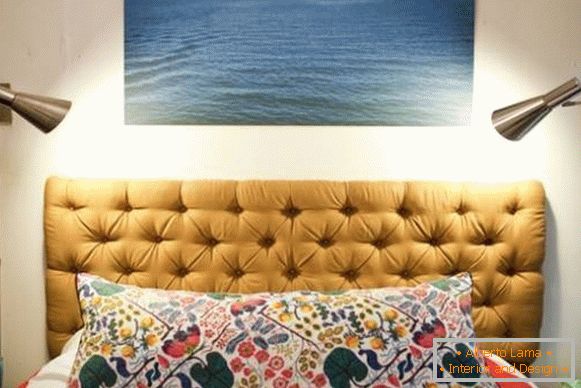
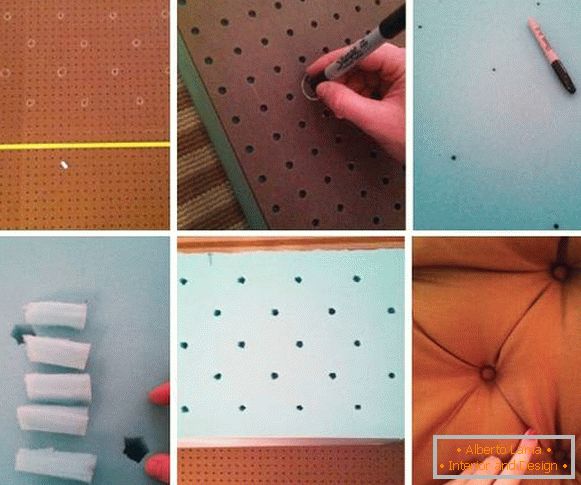
5. The head of the bed, which you can do for yourself with your own hands
There are hundreds of creative ways to decorate a bedroom with a spectacular headboard. About many of them you can learn in our article 65 ideas for decorating the head of the bed with your own hands. Here we will give you a useful photo of the instructions for creating a chic headboard in a classic style. Perforated board, piece of polyurethane foam, fabric, threads and buttons!
6. Useful ideas for home: Roman curtains with your own hands
Beauty and functionality - 2 in one! If you have old blinds, then you can make them according to the example in the photo below. Get more ideas and options for creating such curtains yourself you can in our article Roman curtains in interior design.

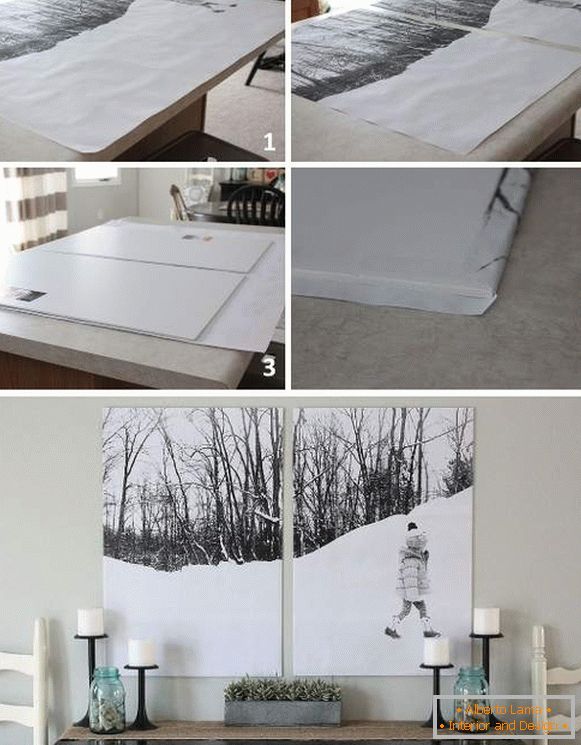
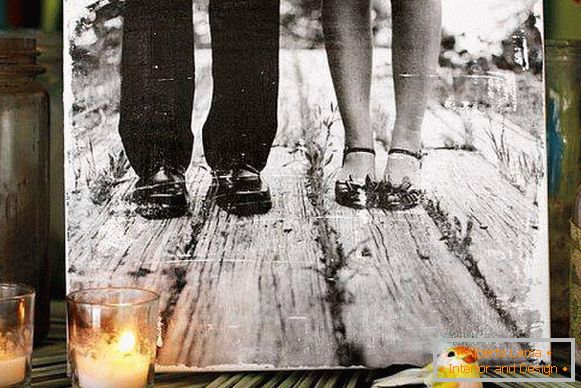
7. We transform photos into wall decor
This is much steeper than just hanging photos within! Your personal photos or any images you like from the Internet can turn into a beautiful wall art for any room. To make such decor yourself, you can apply any of the following methods.
Method 1:
- Find or buy a substrate. In the role of it can come out a thick sheet of foam or styrofoam (as in this case), a board and other improvised materials.
- Print a photo by first editing its dimensions so that they are about 5 cm larger than the size of the substrate. These "extra" centimeters will go to the folds.
- Cut the photo and the substrate into parts if you want to get a modular set, not the whole picture. Otherwise, skip this item.
- Put the photo on the substrate and wrap the ends. The author of this product used a double-sided adhesive tape to fix the photos. You can attach it to conventional glue or other available means. The surface of the photos can also be treated with glue or glue paste.
Method 2:
- Print the image and prepare the canvas to which it will be transferred.
- Pull the canvas on the frame and apply a thick layer of gel medium to it. These gels are widely distributed and today they can be bought in any store of finishing materials.
- Put the photo on the oiled canvas and press it down. Leave it for a few hours, but periodically sprinkle with water from the spray gun.
- Carefully, with one fingertips to begin to erase the back surface of the image from the canvas. Remove all paper in this way.
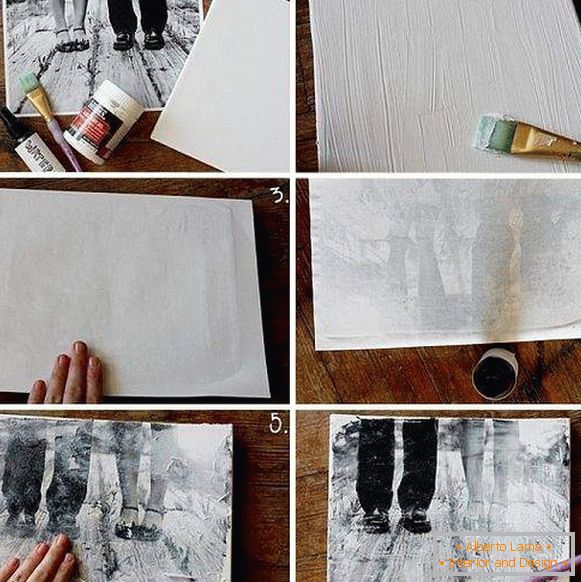
As a result, you get a beautiful wall decor with scuffs, which will only give him a touch of vintage style. It remains only to apply on it the last layer of the gel medium as a protective coating.
For inspiration, here are a couple more ways to decorate your interior with a photo.
 We use the old window frame as a photo frame. How do you like the idea?
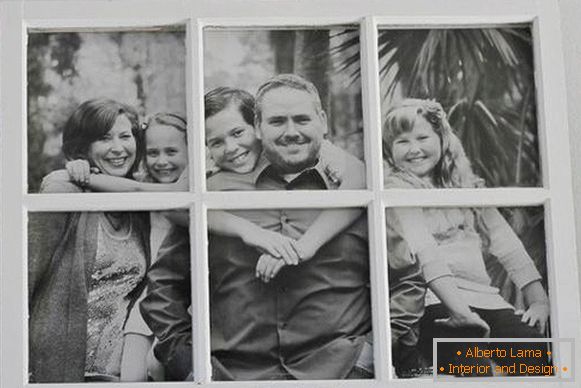
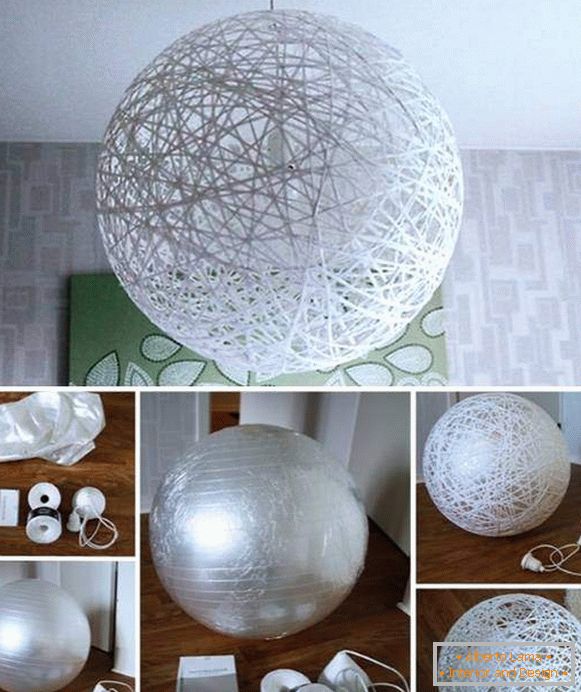
8. Creative homemade lampshades for lighting fixtures
Homemade lampshades made of cloth, paper, thread and other improvised means will not only decorate your house, but also bring an unusual atmosphere to it every dark time of the day.
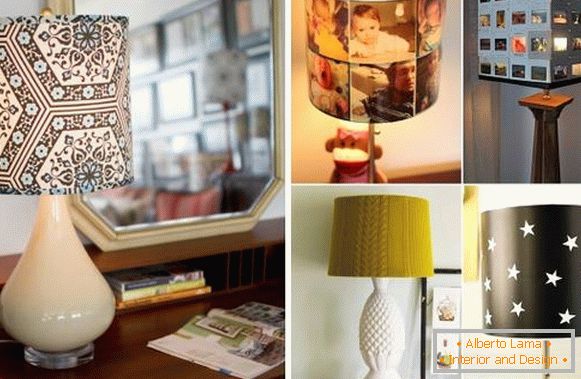
Find the best ideas for your taste in our article The most beautiful lampshades for lamps with their own hands. In the next photo - a popular creative lampshade from the thread.
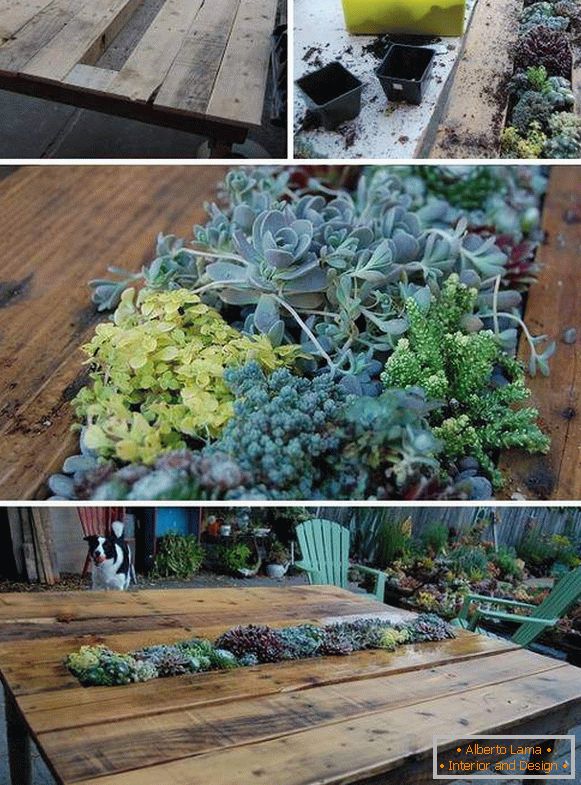
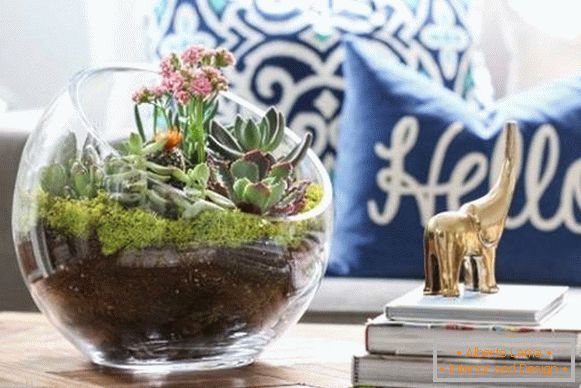
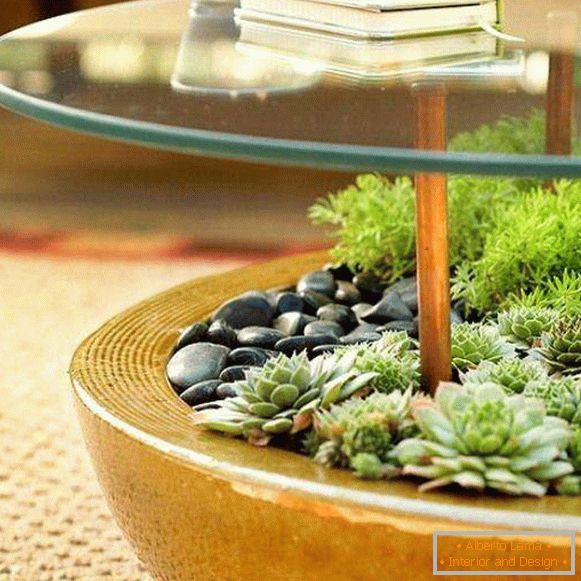
9. Succulents - a living decor for a house with their own hands
A living wall of succulents is, perhaps, the most amazing object from all the crafts for the house, which you can make by yourself. Agree: seeing it from someone in the design of the living room or another room, you could not remain indifferent!
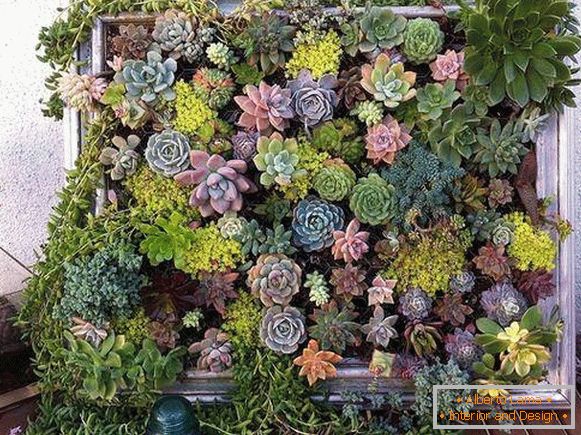
Dekorin will tell you how to acquire such an impressive and eco-friendly decor:
- You will need a shallow wooden container for planting plants and a metal mesh.
- To fix the grid on a container, use an improvised wooden frame that can be made from small boards or chips. Mount on staples or nails.
- Prepare any sucralts for composition. They easily take root in the most difficult conditions and look the most advantageous when you combine different shades and forms of leaves. Common examples of succulents are: aloe, various cacti, young or stone rose (Sempervivum), purgative (Sedum), mountain-grass (Orostachys), etc.
- Fill the container with soil and plant the selected plants into it. As a drain, use any mixture for cacti.

Here are examples of crafts for the house that you can do by yourself with the above method.
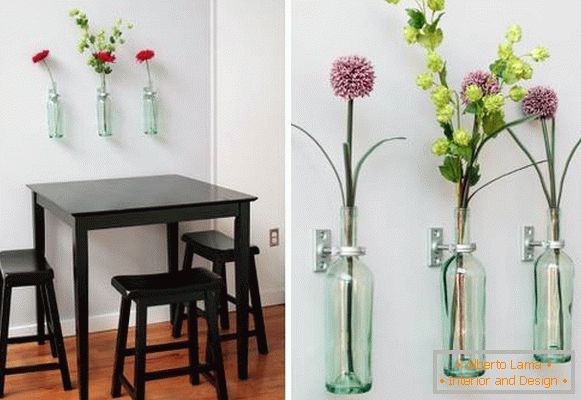
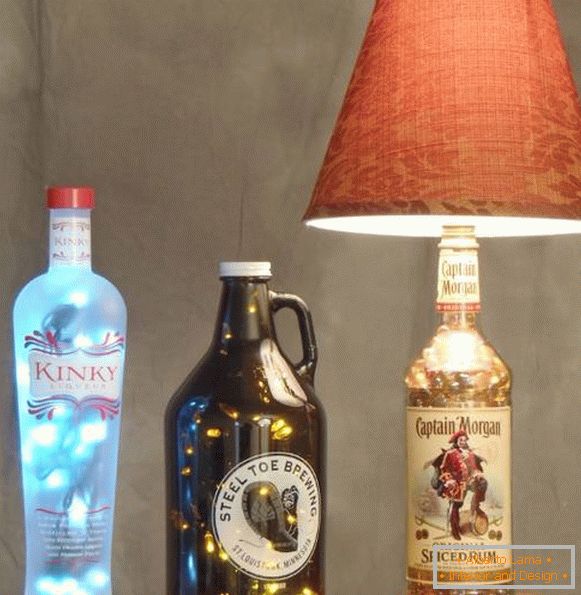
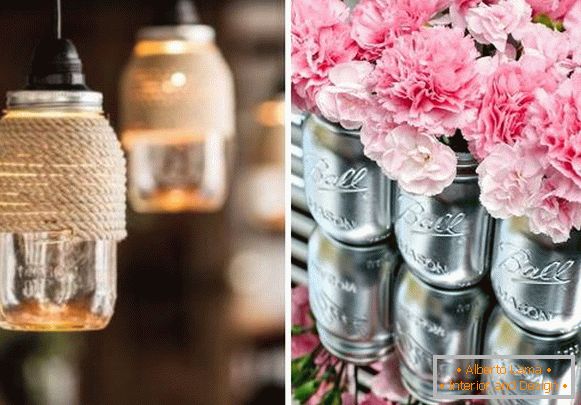
10. Crafts for the house with your own hands from glass containers
Glass bottles and jars often accumulate on balconies and in pantries. What they do not convert today: lamps, candlesticks, vases, table decor ... It's amazing how easily they become part of a stylish interior, it's only necessary to apply a little ingenuity, as well as paints, fabrics, threads, paper and other improvised means. The last portion of the photo for today. Also read: Decorating bottles with your own hands - 50 ideas