Sometimes it's just necessary to revive the interior and at the same time keep within a couple of days. Usually such preparation is connected with coming holidays. Some go to the store to buy unusual things, and others make jewelry themselves, turning the whole process into a fun game to which you can connect all the home. Creating a decor from paper is considered, perhaps, the simplest and fastest option, as the material is accessible, pliable, and the technique of its transformation is mass. Consider a series of master classes to create original interior decorations: temporary and permanent.
See also: 75 photos of design ideas by their own hands 


From paper, you can create a decorative Christmas tree for the New Year, a couple of wedding swans, garlands, fans or posters on the wall, "terrible" decorations for Halloween or Easter baskets from newspaper tubes. With the help of paper crafts, the design of the room will become "livelier" and more original.


It is impossible not to mention the youngest, modern technique Cubeecraft, in which from the paper angular figures of characters of films, books, comics are made. The assembly is done according to a single scheme, and the emphasis is on coloring in bright colors.


Flowers
You can make lush, large buds of corrugated paper, neat balls-topiary or luxurious, voluminous bouquets on canvas in the technique of quilling. Probably, everyone made flowers-origami (tulips) in childhood. This is one of the simplest options. With the help of an affordable, pliable material, you can make a real exotic garden that will please the eye in the winter.

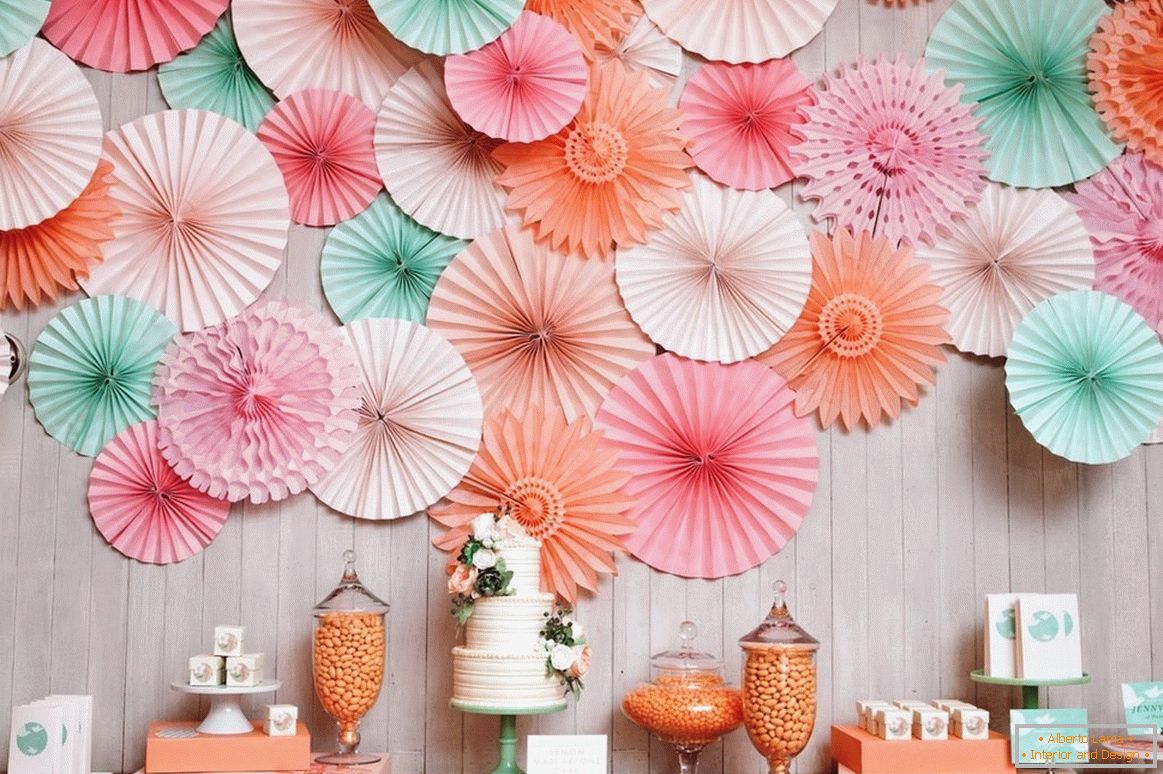
Beautiful, large flowers of corrugated decorate festive tables. They are used as decoration at weddings, suspended to the ceiling or fixed on the wall behind the newlyweds. Also, the flower "wall" will be an excellent photozone at the celebration. Consider step-by-step instructions on how to create a rose. For work you will need:
- Corrugated paper of two or more colors: green on the stem and leaves, white for the core and pink for the extreme petals of the bud.
- Scissors.
- Prepared petal template.
- Wire for the stem.
- Glue.


Using a pattern of paper, cut out the blanks of the petals. During the work, the material is not recommended to stretch, since the corrugation is not collected again. To make a natural bud, the petals should be of different sizes. Of the smallest gather a dense bud, laying them on top of each other and gluing from below. Then the flower begins to wrap with new petals, which also anchor at the base. After the bud is collected, they can be slightly stretched, giving the desired shape and volume. Now you need to cut a couple of leaves. Wire wrap a piece of paper diagonally. Gradually, the lateral short wires for the leaves "weave" into the stem. Secure them with new layers of paper strip. Leaves to them are glued from the "wrong side". Finish work by fixing the flower on the stem. To create a blossoming rose, a ribbon of corrugated paper from one edge is cut with a wavy line, and then twisted. Such a flower decor can decorate a house not only for holidays. A bouquet or topiary made from luxurious buds is suitable for any room: kitchen, bedroom, living room.
See also: Decorative panel on the wall with your own hands +75 photo 


Original will look like a decor, made in certain colors, at weddings. Now it is fashionable to organize celebrations, where guests come in clothes in advance of "approved" shades. For example, a zone for photo shoots with pink and white buds will look good as a background if the photographers are dressed in red.


Fans
The fan, fixed on the wall behind the back of the sofa, will become a smart addition to minimalism or Japanese, Chinese ethnic style. It's incredibly easy to make it. The sheet is folded "accordion", and then glue each section on one side. To make the decoration look more solid, choose a paper with a pattern or decorate it yourself. In the center of each fan, you can glue a button or a large bead. In complex models, two sheets of paper of different sizes are used, which are folded in accordion with the same pitch, and then simply superimposed and glued together in the center.


Paper garland
Paper garlands are made of flat or three-dimensional figures, which are symbolic for the coming holiday:
- Rabbits, flowers, baskets for Easter.
- Hearts, butterflies, roses for Valentine's Day or just a romantic evening.
- Christmas trees, balls, snowflakes, figurines are beast for the New Year's decor.
- Pompons, figures for the birthday of the child. Festive decor for the boy can include locomotives, cars, cabins, flags. For the girl make delicate flowers, pupae.
- Bows, ribbons, figures of the bride and groom for a wedding garland.
- Pumpkins, spiders, miniature witches on broomsticks for Halloween.


Garlands can be used to decorate walls, windows, windowsills or doorways. From thick paper or cardboard, cut out figurines, which are fixed with glue or thread to the line. You can "flash" a string of products on the typewriter. Garland must be painted or colored paper is used in advance.


Curtain of Hearts
The curtain of hearts is decorated with door and window openings. Beautifully looks such a decor against the background of a simple white tulle. Decoration is usually made for a romantic anniversary or on Valentine's Day. The hearts are cut out of paper and glued to the lines, which are then fixed on the cornice or on the slope. Also, they can be made from strips of the same length. Two such ribbons are folded into the heart and fastened with two staples using a stapler. To the lower "acute" part immediately add two more strips. They also fold a heart and collect the vertical garland on the same principle. They will need five or ten pieces to get a whole curtain.
Read also: Decor of seashells - 10 ideas for decorating with your own hands 


Quilling
To learn how to work in the quilling technique, you need a well-developed fine motor hand. It is with the fingers that each element is shaped, and there are more than thirty of them in quilling: tight and free spirals, paws, arrows, horns, eyes, semicircles, ordinary and curved drops, sheets, triangles, curls, crescents, squares.

Since it is too long to cut colored paper into strips for a long time, it is easier to purchase a ready-made set, which also includes tweezers and a special stick with a longitudinal notch at the end. In this slot insert and fix the tip of the tape, which is then wound. If you need a tight spiral, then the tip is immediately fixed with glue. By the way, most of these elements are made by novice pictures. To give a different shape, the twisted strip is carefully removed from the stick and manipulated with your fingers to create corners or flattening. Then the element is glued to the canvas. In the quilling technique, masters make complex modular paintings, where more than 20-30 colors are used.


Origami
Origami относится к одной из самых сложных техник. Сложить журавлика, кораблик, лягушку или тюльпан достаточно просто, но это далеко не предел для мастеров. Главная трудность и основное правило в классическом оригами — бумагу нельзя рвать, резать, склеивать или закреплять иным методом. Фигурка должна быть цельной. Модульное оригами предполагает создание множества фрагментов сложной фигуры, которые «вкладываются» друг в друга опять же без использования клея. В «мокрой» технике можно смачивать бумагу из пульверизатора, чтобы получились мягкие изгибы. Обычно это требуется при создании фигурок животных.


Panno and posters
To create a panel of paper, do not need a complicated, step-by-step instruction or detailed guidance. The technique can be any. The main thing is that the picture has a volume. The simplest version is the use of corrugated paper or folding a leaf in such a way that its edges protrude beyond the frame. It is difficult to draw posters on your own, therefore photo printing will come to the aid. As already mentioned above, they are additionally manually decorated with colored pieces of paper to distinguish accent zones.


Conclusion
Paper - a fragile material, but in its compliance is hidden the main advantage. It can be given any shape that can be easily fixed with the help of glue or thread. A durable paper craft can not be called, but the decor is created to reflect the mood of the owners. Jewelry is like a change of seasons, should periodically leave the interior to give a place to new ones that will help look at the slightly bored design from a different angle.


")