Lovers of recreation in the country manor, summer residents, beginners landscape designers will be interested to learn how to make a decorative well in your summer cottage, how to decorate it. Such structures were once in every yard, were fully functional. Now water supply is available almost everywhere, and wells with a variety of decor become a wonderful element of the landscape design of the local area, its zest. Before placing a well in the area, a detailed plan should be drawn up where it will be located. If an independent production of this element of the landscape is planned, then a design scheme, calculation of the total amount of materials for implementing the idea, is still needed.


The well should be well suited to the other design of the site, not to be superfluous in it, not to clutter up space. The scenery surrounding it should create a single ensemble.
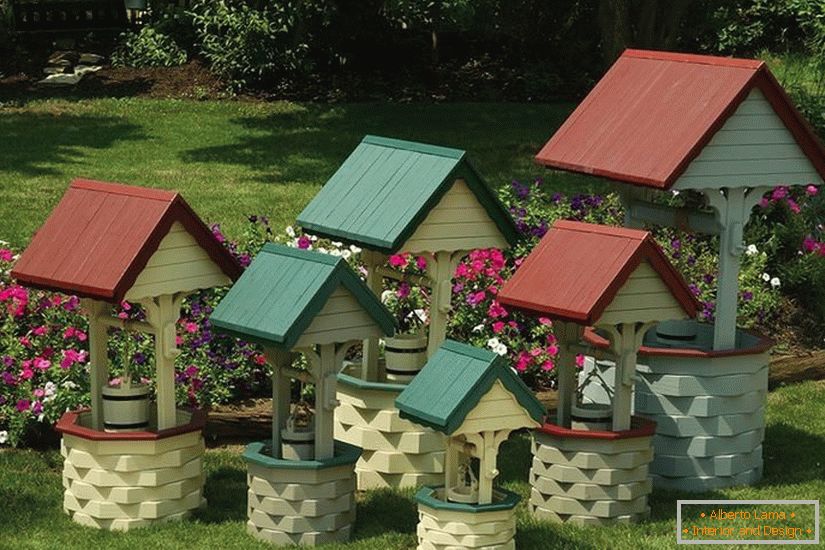
Variants of constructions
Firms engaged in the manufacture of garden decorations, sell a variety of finished well designs. They are quite expensive, most of them almost the same. If you order a well for an individual project from a landscape designer, then the construction will be unique, perfectly fitting in the interior of the garden, but excessively expensive. The best option is to choose or build the structure yourself.

A well can be:
- in the form of a small carved tenement house;
- with a "crane" and without a canopy;
- in the form of a "Chinese" house with a tiled roof;
- wicker high "nest";
- with a small fountain;
- in the form of a mill or steamer.
According to the form, this structure can be circular, cylindrical, square, rectangular, hexagonal, asymmetric. It must outwardly correspond to other structures on the site - the house, the garage, the shed, the bathhouse, the chicken coop, and still be in a similar design, from similar materials.

Materials used in the construction
Raw materials for making a well bowl, with a canopy or without, are chosen the most diverse:
- A rock. Any stone structure looks monumental. The basis can serve as a ring of concrete - they are used in the construction of "real" wells. The structure can be made entirely of stones or with wooden elements. If you decorate it with bright colors, it will be beautiful, original. As a facing, colored stones of various shapes, including artificial ones, are used.


- Tree. A wooden well for a country plot is easy to make yourself. Wood - the material is accessible, easy to handle, eco-friendly, durable. It's easiest to fit into the interior of the garden, and if you have the skills of woodcarving, a small set of tools, then you can create a real miracle. Wooden buildings need protection from humidity, rot, mold, so they are covered with stains, varnishes, special paints. For work used logs, bars, rough boards, lining, branches and stuff.


- Brick. Decorative well of red brick creates the effect of the old - it can even be appropriately decorated. The design turns out to be quite heavy, therefore before installation it is desirable to fill the strip foundation, otherwise the building will eventually have a chance to skew or "go" deep into the ground. Instead of bricks also use slag blocks, which are tiled.


- Other materials. To make the base, you can use any improvised items: unnecessary tires, pre-painted them, metal poles for racks. A small well is made of wicker from vines, pine roots and even wire. For decoration use ceramic and glass mosaic, decorative plaster. Inside put an iron barrel, a plastic container, an old large saucepan. The roof is made with tiles, bitumen, remnants of ondulin, reeds, bamboo, moss, metal, siding.


The space around the well is made of paving slabs, pebbles, decorated with plants in pots, plaster sculptures, carved "garden dwarfs".
Master class with their own hands
There are very simple types of wells, which even a child can do. But we will consider a step-by-step manufacturing by our own hands of a wooden decorative well with six corners. Such as in the picture below.

Materials, tools, drawings
Of the main raw material, a bar or boards are used. The details cut from them will need to be covered with special protective compounds, paying special attention to the ends.
Tools will require:
- electric jigsaw;
- saw;
- statues;
- drill or screwdriver;
- fasteners - nagels and screws;
- gon and roulette;
- milling machine.
To save time and material it is desirable to make the most detailed drawing. Step-by-step manufacturing according to the preconceived instructions will go faster. Below is a rough outline of the well. Dimensions and proportions can be any - it all depends on your imagination. 
Assembling the bottom
Wood materials are marked, leaving marks for slot slots, according to the drawings. Cutting the tree should be perpendicular to the fibers, and cut the grooves in parallel, so as not to form burrs. In the lower part of the well, the slits on the lowest and upper parts are made from one side, and on the other - from two, in a convenient way to connect with each other. To the edges were beautifully processed, the chamfer is removed from the boards, as well as all unnecessary so that the joints do not have any slits. For the rigidity of the head to the top of the bolt another board or bar - there will be fastened "collar". In the places where they plan to mount the racks, cut the grooves.
See also: Modern landscape design: novelties and trends 


Racks and roofing
Planks or beams, for the manufacture of racks, mark with smooth transitions or geometric patterns - as you like. The contour is cut using a jigsaw, and if you use a grinding nozzle on a drill, the edges will come out polished. The posts are fixed with screws. The upper part of them is filed in the form of incomplete angles, the supports are fastened with bridges with chopped wood.
Holes for screws and chop drill a little less in diameter, so that the fasteners are as tight as possible. All elements of the roof: rafters, roof slats, the retaining plate is sawed at an angle, in accordance with the drawing. In the dome, grooves are also made. The rafters are reinforced in pairs using glue. "Umbrella" make out slats, start better from below, you can fix it with nails, bolts, screws. At the end, a decorative poppy is mounted.


Making buckets and decks
The deck is a round beam, which is fastened to the posts using wooden nagels. The bucket is made from several dies of the same shape and size. Their ends are treated with glue, spread horizontally, face up. That there were no shifts, it is possible to fix with an adhesive tape. Next, the workpiece is wound with a cylinder, leaving it to grasp. Cut the bottom, corresponding to the inner diameter of the ring, drill the holes for the fasteners. The resulting vessel can be further pulled together by two tin bands. The bucket is collected - instead of handles there will be a decorative cord, a beautiful chain. As individually look like a deck and a bucket, look at the picture below. Now the design is going to be put together, it can be painted in any color, varnished.

If the well is relatively small and light, it is advisable to place it on a concrete base and fix it so that a strong wind does not overturn the structure.


Decorative design
Decoration of the well, as well as its general appearance, should correspond to the stylistics of the country plot. When a large part of the plot is occupied by a vegetable garden, a miniature garden with a rest area and a rock garden is built around the well.
Stylistic options:
- maritime style - the role of the mine is performed by a tub or barrel with anchors on the sides, the handle-gate is occupied by the steering wheel with ropes, the tiles around are made in the form of waves with sea foam. In the evening, a bluish backlight may turn on;


- Chinese style - reminiscent of the traditional architecture of China. A distinctive feature - the corners of the roof are bent upwards;
- The minimalist style is a strict monophonic bowl of concrete. Above it is an arch of steel, a bucket on an ornamental cord. Around a smooth green lawn, a fence of contrasting color;
- Antique style - the base of concrete with stucco, racks and elements of the roof forged. There is a backlight from several sides;
- medieval castle - artificially aged red brick, tile "antique", natural stone, elements of colored stained glass;
- village style - the well is made in the form of a small mill, next to it there is a flowerbed reminiscent of a cart, fence-fence. The roof is made of straw, moss.


It is very interesting to look at such design solutions:
- "Crane" - is made of untreated wood, the base and bucket is painted with folk ornaments, pasted with artificial flowers;
- Russian Teremok - carved house-well, reminiscent of the tower. A rope on the roof, carved animal figures, next to it is a carved bench, if there is a pond nearby, then a wooden bridge with carved rails through it. From the inside can be highlighted;
- a flower pot - a base is made of stones or wood. Racks and a roof - from figured snags, branches. The structure is partially or completely braided with curly flowers;


- a palm-tree of garbage - two or three pre-painted tires, stacked on top of each other, form the basis. The upper part is a tangle of plastic bottles: stands of brown, and the roof - of green. Nearby may be a flower bed with a fence of bottles or figures of birds, also made of tires;
- construction with a fountain or a waterfall - usually this is a small purchased construction built into the basement on the site. Similarly, a source of water of natural origin is made;
- birch well - is made of different thickness of logs with white-black bark, bucket is also made from untreated birch. The building is used as a flower bed, a table with a canopy.


Conclusion
A decorative well can look anything - its shape, size, design, purpose, choice of materials of manufacture are limited only by imagination, the availability of funds from the owner of the villa. Professional designers recommend using in the design of the site and the well itself as much greenery, flowering plants, because the function of this decorative element is to provide aesthetic pleasure to the owners and guests of the estate, decorating the garden.


