Decorative stone is a remarkable beauty material that is used for various types of decoration, external and internal. It is much easier to make this material lining than ceramic tiles. Moreover, it can be done independently. At the same time, the laying of the decorative stone is carried out with the use of a minimum of materials and tools. Many house masters are afraid that nothing will come of their invention. But there is nowhere to retreat: all materials are purchased, tools are waiting for their time, and friends and relatives are eagerly awaiting (with someone with gloating gloat) how the renovated apartment will look. So, for the work!
There are also disadvantages:
- Friability of the material. A small blow is enough to destroy the material;
- Insufficient moisture resistance (this applies to gypsum stone). When used in the kitchen or in the bathroom, an additional moisture resistant coating is required.


Advantages of wall finishing with stone
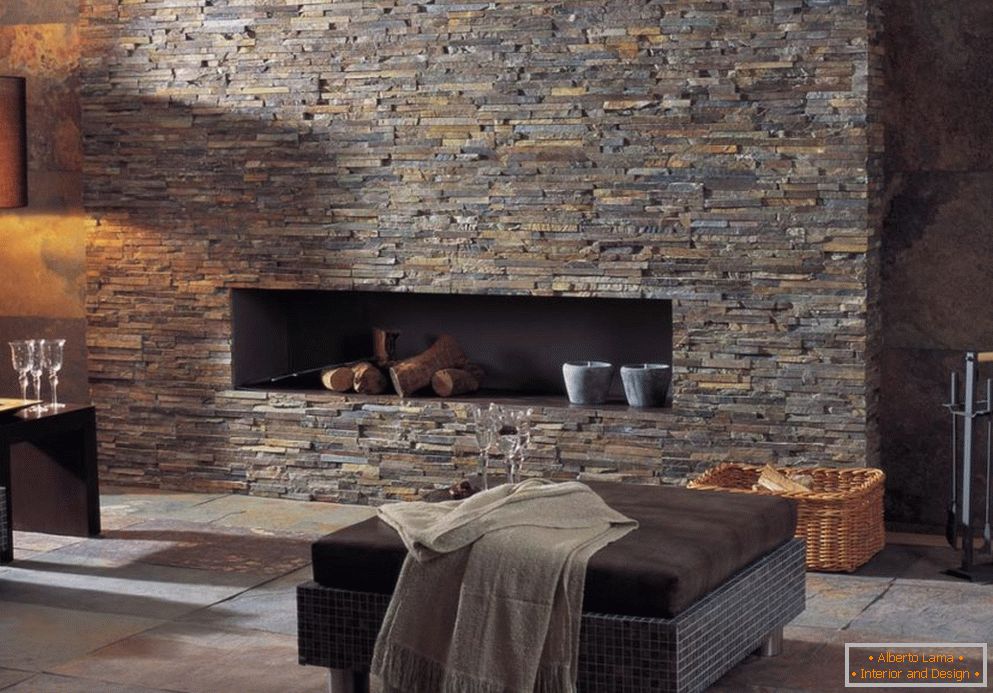
Decorative stone looks great as a finish for window and doorways, as well as a fireplace area. It fits perfectly with indoor plants, as well as aquariums and home fountains. If we talk about the style, then this decoration looks best with the classic interior, adding to it the notes of aristocracy and chic.

In order for the veneer to look really nice, you need to consider one of its features. It will require bright lighting, otherwise the room will look a bit grim. To solve this problem it is possible, laying a stone not entirely, but alternating it with monophonic wallpaper, paint or decorative plaster of a light shade.


Types of decorative and natural stone
The most common varieties of artificial stone - based on cement mortar and gypsum. The gypsum finishing material is unstable to high humidity. Therefore, it is used in living rooms, bedrooms or hallways. Facing artificial stone made of cement, on the contrary, is moisture resistant, that is why it is used in premises with a high level of humidity, for example, in a bathroom, on a balcony, in a bathroom or in the kitchen. Fashion trends of the day - facing materials with a realistic imitation of brickwork and slate. The surface for a brick or clinker is excellent for modern loft interiors, decoration of a zone near a fireplace or a stove, as well as for finishing walls of loggias and balconies. As for the imitation of slate, it is the only kind of decor that forms a single stone surface reminiscent of natural rocks. Each element has its own individual appearance, and the whole composition in combination looks very impressive and charming.
Read also: Ideas for interior decor: 15 ways to decorate things with your own hands 
Of the natural stones used for finishing houses and apartments, the most common are granite, limestone, marble and sandstone.
- Marble is a beautiful aristocratic material with the help of which it is possible to create magnificent "palace" interiors. The color gamut is the richest, but the most popular, besides black and white, are shades of beige, red and brown. It looks best in spacious rooms. With a limited number of square meters of "royal" decoration will look somehow ridiculous.
- The sandstone has 3 primary colors: red, chocolate brown and green. There are three names of the material according to the degree of granularity. Processing and laying sandstone stones is very simple. The material is inexpensive, but quite spectacular. Applied to buildings and as decoration;
- Limestone is an alloy of stones laid in horizontal rows. The shade can be pink, gray, yellowish or white;
- Granite, in addition to a beautiful noble species, features a special strength and durability. Use it for interior and facade decoration. It looks good with other finishing materials.


Mounting Features
Specificity of the technology of working with artificial stone is that it does not have an even facial structure, like ceramic tiles, so removing the plane "to zero" is completely superfluous. Is it necessary to comply with ranks? It is desirable, because the appearance of the cladding from this wins. Now let us consider the main stages of the work related to the laying of artificial stone.


Preparatory work
An important point before assembling the decorative stone is a thorough preparation of the surface. Walls need to be freed from residues of old coatings and degreased. Align the wall to the ideal state is not necessary, because the cladding reliably will hide all the shortcomings. But to check the adhesion of the surface is necessary. Sprinkle it with water and see if there are areas where water does not absorb, but hangs on the wall with droplets. These areas should be subjected to a particularly careful machining, and then repeat the experience with spraying. Carefully scratch the surface of the wall with a brush for metal, then use a paint brush to process the stones from the back and outside.

Before you begin the facing work, place the finishing elements on a flat surface, consider the future drawing. This will allow you to find in advance the best option for placing stones on the wall and avoid confusion.


Required tools for styling
The most common tool that is used when laying artificial decorative stone on the wall.
- Hacksaw for working on wood. It cuts gipso-polymeric stones very well, not worse than a Bulgarian;
- The chair. Indispensable if you need to cut the material at an angle of 45 or 90 degrees;
- Spatulas of different sizes for applying adhesive;
- Kitchen sponges. They are convenient to use when filling the joints;
- Chisel, sandpaper, file. With these tools, you can easily adjust the stones, as they are not always cast in an irreproachably flat shape. It is most convenient to use a chisel for work, and then sand it with sandpaper;
- Building level and a simple pencil;
- Mixer for construction. It can be replaced with a drill with a nozzle. It is convenient for mixing glue and shpatlevochnogo formulations.
We need the following materials:
- Putty. It is used to seal joints at corners and between joints;
- Varnish on the water. It will be necessary to cover places in the field of seams and chips;
- Tile glue (it can be replaced with liquid nails).
Dilute the tile adhesive so that you use the finished solution for 15, a maximum of 20 minutes. Longer - it is impossible, because the mass begins to freeze. The best consistency of the adhesive solution is creamy, like toothpaste. In any case, you need to read the instruction.

Stacking technology
To properly and beautifully trim the walls with artificial stone, does not necessarily have the experience of construction or design work. A little diligence, patience and desire to do something yourself - everything you need. The lack of experience compensates for the building material. General conditions for finishing works are as follows:
- The range of temperatures when facing an artificial stone is from 5 to 30 degrees. If the air temperature exceeds 30 degrees, then approximately half an hour before the operation, the wall and the back surface of the stone are moistened with water.
- Before you start laying, inspect each stone. Sometimes the opposite sides have different shades. It does not hurt to ask the seller which side is better to stack the material.
- Make the markings on the wall. Its step is up to 500 mm. It is necessary to know in advance how the elements of the decor will lie down.

Ways of laying
There are 2 ways of laying artificial stone: with and without. The first method is used to decorate the "brick" texture. Lay a wall without a barbed can be artificial stones, imitating shale. Seamless styling is easier and faster. The essence of it is that the stones should be placed one from the other at a minimum distance. Excess glue should be removed in time, otherwise it will be difficult to do. The essence of the laying of stones with the seaming of seams is that the elements of the lining are laid at a distance from each other. In this case, to the list of tools and adaptations, you need to add the pre-purchased binder. It will be required and the color in the tone of the finishing stone (or, conversely, the contrasting shade), for the seams.
Read also: Decorating flower pots with your own hands - 8 ideasNow the process itself is step by step. Stone laying begins with corner elements, alternating short and long stones. To create a support, the lining is led from the floor to the top. When the glue dries down in the lower layer, you can proceed with further laying. The time of polymerization of the adhesive depends on the particular brand. For individual adhesives, polymerization is not necessary at all. In each case, you need to read the instructions. If a seamless laying is used, care should be taken to ensure that the adhesive also enters the end parts of the stones without reaching the front of the decor. Features of the design of curvilinear or complex areas:
- Complex elements are performed using a file and / or chisel. This skill is useful if you need to elegantly bypass the outlet or switch, as well as when decorating slopes, entrance doors and interior arch openings.
- For a perfect cutting of corners use a chair. When laying stones, cut at an angle, watch their tight fit. Convenient use of the chair and for the formation of right angles. If there is no seat at hand, you can use an object with a precisely verified right angle.
- Figured cutting performed on the contour of the texture.

Filling the seams with putty can be done with a plastic bag from under the dairy products. Fill the package with putty mortar, and then release through a small hole directly into the seam. Surplus is removed with a sponge from under the dishes.


Finishing
To keep the stone properties longer, it is covered with a special impregnation. Apply it, after having perfectly cleaned the wall. If you need a shiny surface, then top is applied acrylic lacquer. If you want to achieve maximum naturalness, then impregnation, on the contrary, is diluted with water. Beautifully looks decorative stone, painted in various shades.


Errors which should be avoided when laying a stone
Beginner masters when facing the walls with a decorative stone are often allowed such errors:
- A wide seam that does not adorn, but spoils the whole impression of the composition;
- Poor priming of the wall. After a while, the lining begins to fall off;
- Damage and chipping of individual trim elements during trimming;
- Wrong choice of texture and shade;
- Errors of randomness, allowed from the very beginning. This leads to the fact that the material is stacked chaotically. The external appearance of the wall from this greatly loses.

The cost of repairs depends on the amount of work, prices for materials and prices for specialists. Laying the cladding with your own hands makes it cheaper.


Conclusion
Work, especially not too experienced masters, you need without hurry, then the result will be much better. It is advisable to plan and grind the seams 2-3 days after the end of the cladding works, when the glue is completely dry. If you follow all the steps according to all the rules, the result will be really impressive.

